Fit Morpheus · Strength & Functional Fitness
Carrying groceries, climbing steps, lifting a bag and getting up from a chair all require strength. Functional strength exercises help you build physical capacity that you can apply to those tasks—and to the activities you want to keep enjoying.
The exercises below give you practical options for squatting, stepping, hinging, pushing, pulling, carrying and controlling your body. You do not need to perform all 12 in one workout. Use this as an exercise reference, choose variations that suit you, and build from a manageable starting point.
For the underlying concept, read What Is Functional Strength? For a ready-made weekly schedule, use our Strength Training Over 40 A/B program.
What Makes a Strength Exercise Functional?
An exercise is useful when it develops a capacity relevant to your goals. A squat can build leg strength for standing up; a carry can challenge your grip and trunk while you walk with a load. That does not mean gym exercises automatically teach every real-world task. Hiking, lifting awkward objects and moving on uneven ground also require practice.
Machines, bodyweight exercises and free weights can all contribute. You do not have to balance on an unstable surface or copy a household task exactly to build useful strength. Choose equipment that lets you train with control and gradually increase the challenge.
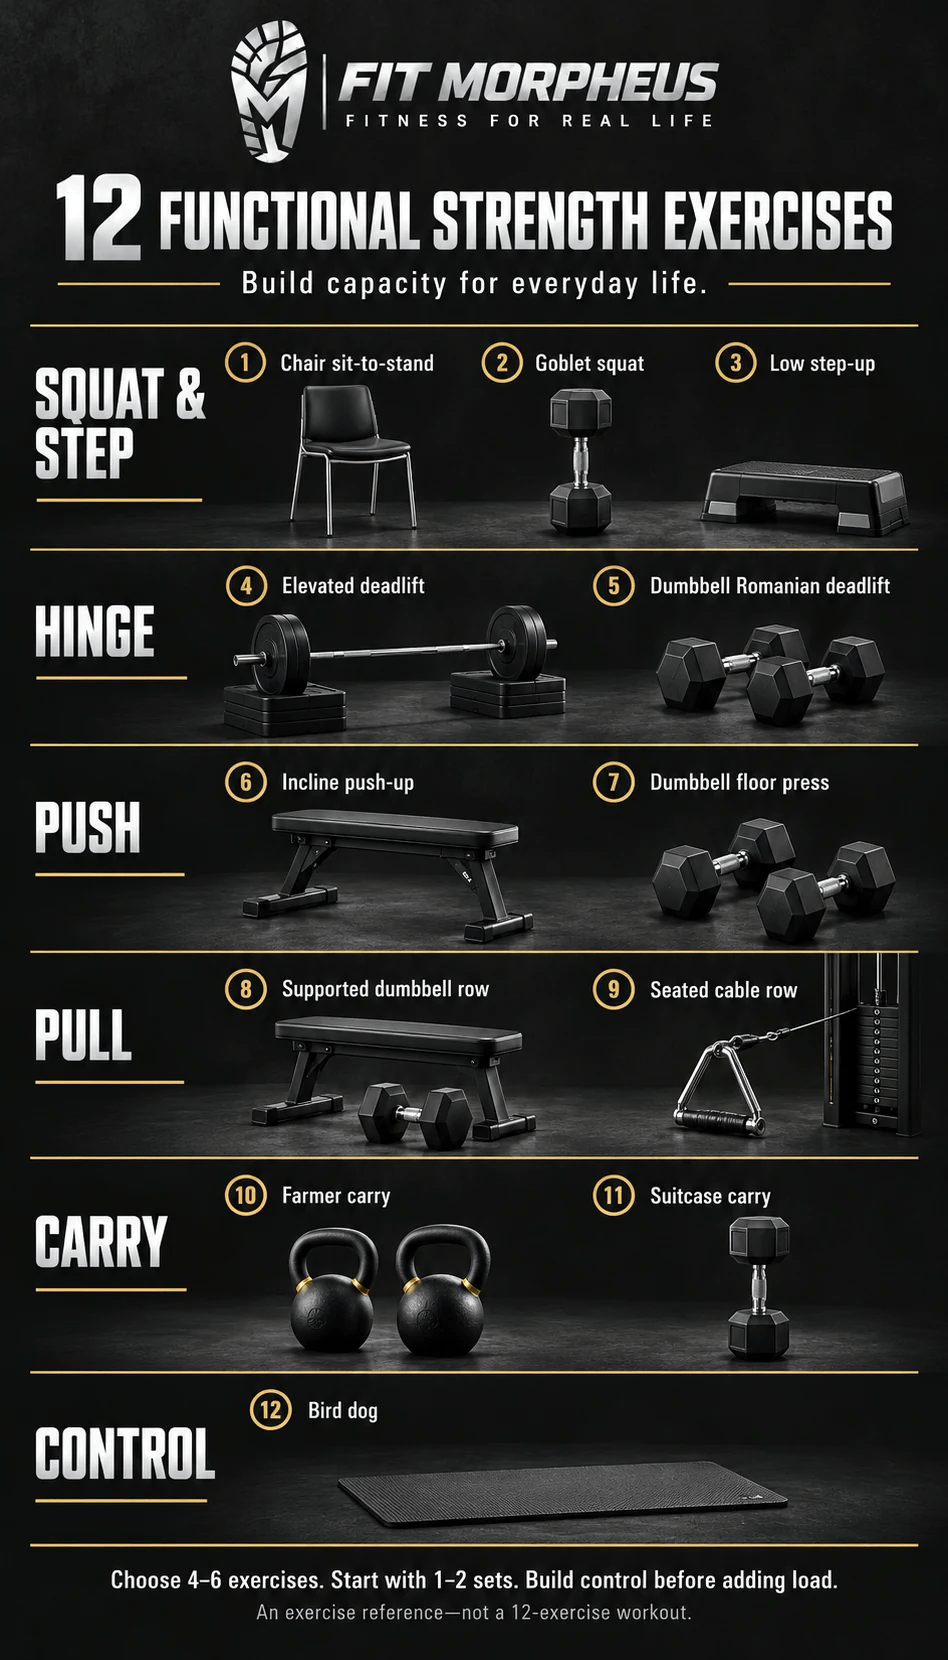
12 Functional Strength Exercises at a Glance
| Pattern | Exercise options | Related everyday demand |
|---|---|---|
| Squat and step | Chair sit-to-stand, goblet squat, low step-up | Standing up and climbing steps |
| Hinge | Elevated deadlift, dumbbell Romanian deadlift | Producing force to lift a load |
| Push | Incline push-up, dumbbell floor press | Moving a load away from your body |
| Pull | Supported dumbbell row, seated cable row | Drawing a load toward you |
| Carry | Farmer carry, suitcase carry | Holding bags while walking |
| Control | Bird dog | Controlling your trunk as your limbs move |
1. Chair Sit-to-Stand
Why use it: This is a clear starting point for training the action of standing from a seated position.
Sit near the front of a sturdy chair with your feet planted. Lean forward enough to bring your weight over your feet, then stand. Lower yourself with control rather than dropping onto the seat. Place the chair against a wall if it could slide.
Start: 6–10 repetitions. Use your hands or a higher seat when needed. Progress by reducing assistance or holding a small weight close to your chest. Avoid choosing a lower chair before you can control the movement.
2. Goblet Squat
Why use it: Holding a weight at your chest provides a straightforward way to add resistance to a squat.
Hold a dumbbell or kettlebell close to your chest. Choose a comfortable stance, bend your knees and hips, and lower through a range you can control. Keep your feet planted, then stand. Your depth can vary; there is no requirement to reach the floor.
Start: 6–10 repetitions with a light load. A bodyweight squat to a chair is an alternative. If reaching depth is difficult, see our hip mobility exercise guide, while recognizing that mobility is only one possible factor.
3. Low Step-Up
Why use it: Step-ups train one leg at a time and connect naturally with stair climbing and uphill movement.
Use a secure, low exercise step. Place your whole leading foot on it, rise onto the step and lower slowly. Keep a sturdy support nearby. Let the leading leg do most of the work rather than bouncing off the trailing foot.
Start: 6–8 repetitions per side without weights. Begin with a lower step or more support if balance or control is limiting. Increase repetitions before adding load; do not raise the step and add weight together.
4. Elevated Deadlift
Why use it: Starting a weight above floor level can make the lifting position easier to learn and repeat.
Place a kettlebell on a stable raised platform. Stand close, move your hips back and bend your knees enough to reach the handle. Grip it, brace comfortably and stand, keeping the load close. Return it to the platform under control.
Start: 6–10 repetitions. Choose the platform height for your current reach and control. Rehearse the hinge without a load first. Avoid makeshift supports that could tip or collapse.
5. Dumbbell Romanian Deadlift
Why use it: This hinge variation challenges the hips and back of the legs without requiring the weights to start on the floor.
Stand with dumbbells beside your thighs and a slight knee bend. Move your hips backward as your torso leans forward, keeping the weights near your legs. Stop before you lose control or need to reach farther with your back, then stand.
Start: 8–10 repetitions with light weights. The dumbbells do not need to touch the floor. Use unloaded hinge practice or the elevated deadlift if the movement is unfamiliar.
6. Incline Push-Up
Why use it: Changing the support height makes a pushing exercise easier to scale.
Place your hands on a secure elevated surface. Step back, maintain a controlled body position, lower your chest toward the surface and press away. Choose hand spacing and elbow movement that feel comfortable.
Start: 6–10 repetitions. A wall is an easier option. Progress to a lower surface when you can repeat the movement without sagging or rushing. Avoid lightweight furniture that could move under pressure.
7. Dumbbell Floor Press
Why use it: The floor provides a supported pressing position and limits how far the upper arms travel behind you.
Lie on your back with knees bent and manageable dumbbells above your chest. Lower slowly until your upper arms gently contact the floor, then press up. Keep your wrists controlled and avoid bouncing your elbows.
Start: 8–10 repetitions. Use weights you can safely position and set down. If floor access is difficult, select an incline push-up or machine chest press instead. Limited range does not make an unsuitable shoulder movement appropriate.
8. Supported Dumbbell Row
Why use it: Supporting yourself reduces the balance demand while you train pulling strength.
Use a stable bench or support for one hand. Hold the dumbbell in the other hand, pull it toward your side and lower steadily. Let your arm move through a comfortable range without turning the repetition into a large torso twist.
Start: 8–12 repetitions per side. Keep the weight manageable and your support secure. A seated cable row is an alternative when the bent-over position does not suit you.
9. Seated Cable Row
Why use it: A cable machine offers an adjustable pulling option that does not require supporting a dumbbell.
Adjust the seat and foot support so you feel stable. Pull the handle toward your torso with a controlled movement, then allow your arms to extend. Avoid generating each repetition by rocking backward and forward.
Start: 8–12 repetitions. Choose a comfortable handle and grip. A resistance-band row can substitute, but only use an anchor designed and secured for the exercise.
10. Farmer Carry
Why use it: Walking with a weight in each hand combines grip demand, load management and movement.
Pick up two manageable weights and walk along a clear, level route. Keep the weights controlled, take comfortable steps and continue breathing. Turn slowly with enough space, then set the weights down carefully.
Start: 15–30 seconds. Finish before grip fatigue compromises your hold. Build controlled duration before adding load. Do not use stairs, crowded areas or a moving treadmill for this starting drill.
11. Suitcase Carry
Why use it: Carrying one weight creates a different trunk-control demand from holding equal loads on both sides.
Hold one weight at your side and walk on level ground. Maintain a comfortable upright position without markedly leaning toward or away from the load. Set it down, then repeat on the other side.
Start: 15–25 seconds per side. Use a lighter weight than you might expect. If you cannot control your position, reduce the load or choose a bilateral carry. This is a training option, not a posture correction test.
12. Bird Dog
Why use it: This low-load drill lets you practice controlling your trunk while moving your arms and legs.
Begin on hands and knees on a comfortable surface. Reach one arm forward and the opposite leg backward through a range you can control. Return slowly and change sides. Keep the movement small enough to avoid excessive rocking or arching.
Start: 5–8 repetitions per side with brief pauses. Move just one limb at a time if the combined reach is difficult. Skip this drill if kneeling or wrist loading is uncomfortable and obtain a suitable alternative.
How to Choose Exercises Without Doing All 12
Select four to six exercises covering the main patterns. For example, choose one squat or step, one hinge, one push, one pull and one carry. Bird dog can be optional control practice. Similar exercises are alternatives, not items you must stack together.
A manageable starting approach: Begin with one or two sets using the starting ranges above. Warm up with comfortable movement and lighter practice repetitions. Rest around one to two minutes, or longer when needed, so the next set remains controlled.
Finish most sets with roughly two or three good repetitions still available. These are practical starting suggestions, not an individualized prescription.
General adult activity guidance includes muscle-strengthening work on at least two days per week involving all major muscle groups. Your complete routine should also include aerobic activity. Use the existing A/B strength program when you want a weekly plan rather than assembling one from this list.
Make Progress You Can Repeat
Keep a few exercises consistent long enough to learn them. Record your variation, repetitions, sets and load. When you can reach the upper end of your range with steady control and some effort left, add a small amount of resistance and return toward the lower end.
Bodyweight options can progress through less assistance or a more demanding variation. For carries, add controlled time before weight. Change one variable at a time, and account for physical work, hiking and other exercise when judging recovery.
Do not treat soreness as proof of success. You can have a productive session without becoming very sore. Repeating a load with better control can also be progress.
Adapt the Exercise to Your Starting Point
Age alone does not determine the variation you need. Equipment, training experience, floor access, balance and previous injuries all matter. A machine or supported movement can be an effective option; footwear should match the surface, task and your needs.
Change or stop an exercise that produces new or worsening pain. Persistent symptoms or an existing condition may require individual guidance. Chest pain, fainting or unusual severe breathlessness warrant stopping exercise and seeking medical attention.
Frequently Asked Questions
Can functional strength exercises build muscle?
They can when resistance, training effort and progression provide an appropriate stimulus. “Functional” describes the purpose of training; it does not replace the principles of resistance exercise, nutrition and recovery.
Do I need kettlebells?
No. Dumbbells, machines, bands and bodyweight variations can all have a role. Choose equipment that supports controlled movement and practical progression.
Should I do these exercises barefoot?
Barefoot training is optional. Shoes can provide protection and traction, and gym rules may require them. See our Barefoot Training & Foot Health guide for the broader considerations.
Which exercise should a beginner start with?
Start with variations you can repeat comfortably, such as a chair sit-to-stand, wall push-up or supported row. There is no single required first exercise. Build several patterns rather than relying on one movement to cover everything.
Put the exercise choices into context:
Sources
- CDC: Adult physical activity recommendations
- CDC: What counts as physical activity for adults
- ACSM 2026 position stand: Resistance training prescription for healthy adults
The exercise selections, cues and starting ranges are Fit Morpheus editorial examples. The cited guidance does not prescribe this exact list or an individual rehabilitation plan.
Leave a Reply